6-8: King Bowser's Castle
Map
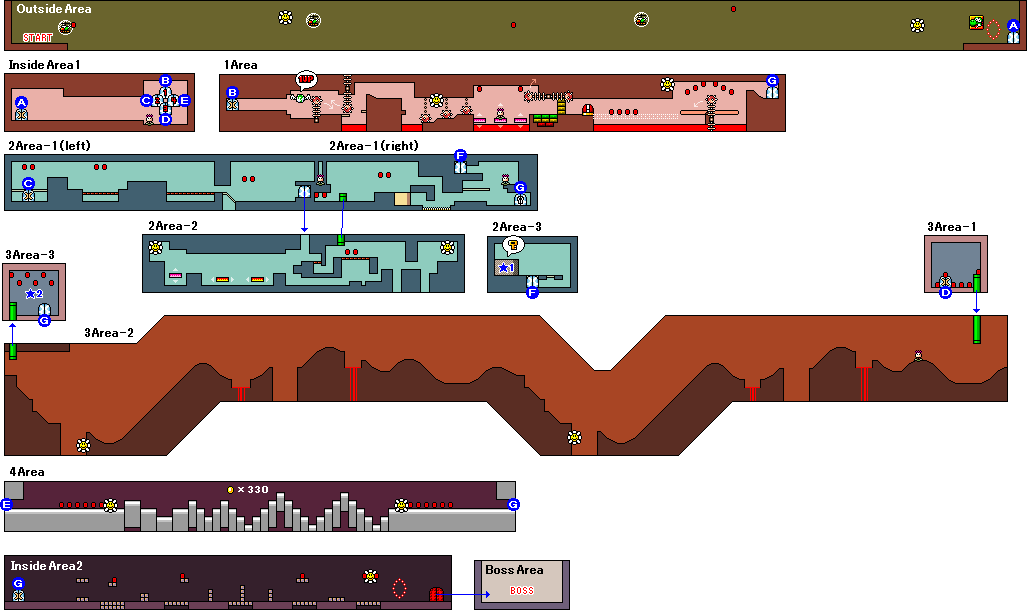
- In Inside Area 1, you can enter the door that you hit with an egg.
- Door 1 (B): lava and Ball 'N' Chain Area
- Door 2 (C): Various Shy Guys Area
- Door 3 (D): Tap-Tap the Golden Area
- Door 4 (E): Bonus Area with 330 Coins - The block at ★1 (2 Area-3) transforms into Slime when touched, and defeating it drops a key.
- The Red Coin at ★2 (3 Area-3) will appear after defeating two Shy Guys in the room.
- 3 Area-2 and Inside Area 2 are auto-scrolling area.
Stars
Outside Area ×10
- Pass through the Middle Ring at the far right ×10
Inside Area 2 ×10
- Pass through the Middle Ring just before the Exit Door ×10
Red Conis
Outside Area ×3
- While flying after transforming into a Helicopter ×3
1 Area
1 Area ×12
- Above the central pink Flatbed Ferries ×2
- On the ! Blocks in the later part ×4
- Above the seesaw in the later part ×6
2 Area
2 Area-1 (left) ×6
- Above the entrance ×2
- Above the bridge in the early part ×2
- Above the Caged Ghost in the later part ×2
2 Area-2 ×2
- Below the pipe at the topmost ×2
2 Area-1 (right) ×4
- At the left of the first pipe ×2
- Just after the first pipe ×2
3 Area
3 Area-1 ×6
- In the room ×6
3 Area-3 ×6
- Appear after defeating two Shy Guys in the room ×6
4 Area
4 Area ×12
- In the early part ×6
- In the later part ×6
Inside Area 2 ×5
- On the block in the early part ×1
- On the block in the middle part ×1
- On the block in the later part ×1
- Both ends of the Flower on the block in the later part ×2
Flowers
Outside Area ×2
- Just before the second metamorphosis bubble
- Just before the Yoshi Block
1 Area
1 Area ×2
- Between the windup Ball 'N' Chains
- At the top-left of the seesaw in the later part
2 Area
2 Area-2 ×2
- At the top-left
- At the top-right
3 Area
3 Area-2 ×2
- In the central wide hole
- In the final wide hole
4 Area
4 Area ×2
- In the early part
- In the later part
Inside Area 2 ×1
- On the block in the later part
Boss 1: Baby Bowser
The Baby Bowser will pound the ground towards Yoshi, creating a shockwave to attack. When it lands, you should also pound the ground at the same moment to create a shockwave and hit it. If the timing is too late, the Baby Bowser avoids it with a jump. After three hits, the boss is defeated, and the battle with Big Baby Bowser will begin.
Boss 2: Big Baby Bowser
First, rocks will fall where the arrow appears, so move away from that spot. Once the rocks stop falling, a balloon carrying a giant egg will fly in the stage. Throw the egg at Bowser's face to deal damage. The flames Bowser spits will fly in a straight line from his mouth, so you can avoid them by moving right after they're launched. After dealing three hits, rocks will fall again, making the platform even narrower. Deal four more hits to defeat him, and the ending will begin.
Enemies
| Name | Defeat | Description | ||||||||
|---|---|---|---|---|---|---|---|---|---|---|
| Eat | Stomp | Pound the Ground | Egg | Green Water -melon | Red Water -melon | Blue Water -melon | Trans -form | |||
| Shy Guy | ○ | ○ | ○ | ○ | ○ | ○ | ○ | ○ | A normal Shy Guy. It appears from the pipe until the eggs are full. | |
| Fly Guy | ○ | ○ | ○ | ○ | ○ | × | × | ○ | Flying in the sky, carrying a Red Coin, a Winged Cloud, etc. | |
| Woozy Guy | ○ | ○ | ○ | ○ | ○ | ○ | ○ | ○ | Moves forward while performing a somersault. | |
| Shy-Guy on Stilts | × | △ | ○ | ○ | ○ | ○ | ○ | ○ | Once you stomp on it, it falls off the stilts and turns into a normal Shy Guy. It can be defeated instantly with Pound the Ground or an egg. | |
| Boo Guy | ○ | ○ | ○ | ○ | ○ | ○ | ○ | ○ | Floats in the air and sways gently. | |
| Stretch | ○ | × | × | ○ | ○ | ○ | ○ | ○ | Spits out watermelon seeds when you stomp on it. | |
| Flamer Guy | ○ | × | × | ○ | ★ | × | ○ | ○ | Eating it allows you to use fire. Stomping on it causes damage. | |
| Spear Guy | ○ | × | × | ○ | ○ | ○ | ○ | ○ | Carrying a spear, it deals damage when stepped on. It can be defeated by swallowing or using an egg from behind. | |
| Dancing Spear Guy | ○ | × | × | ○ | ★ | ○ | ○ | ○ | Dances while carrying a spear. | |
| Fang | ○ | ○ | ○ | ○ | ★ | ○ | ○ | ○ | Flies through the sky, swaying gently. | |
| Milde | ○ | ○ | ○ | ○ | ○ | ○ | ○ | ○ | Stomping on it makes it pop. | |
| Bandit | × | △ | ○ | △ | △ | × | × | ○ | Kidnaps the baby. It can be defeated by pounding the ground once, stomping on it three times, or hitting it with eggs or a Green Watermelon six times. If you use eggs or a Green Watermelon, the last three hits will grant you a 1UP. | |
| Gusty | ○ | ○ | ○ | ○ | ★ | ○ | ○ | ○ | Flies straight through the sky. | |
| Caged Ghost | × | × | × | △ | △ | × | × | × | Blocks the passage inside a pipe. If you hit it with eggs repeatedly, it will shrink, allowing you to pass through. | |
| Skeleton Goonie | ○ | △ | ○ | △ | △ | ○ | ○ | ○ | If you stomp on it, hit it with an egg, or eat it and then spit it out, it becomes a Flightless Skeleton Goonie. | |
| Slime | × | × | × | △ | △ | × | × | × | Gets smaller each time you hit it with an egg. | |
| Tap-Tap the Golden | × | × | × | × | × | × | × | × | Chases you. If you hit it with an egg, it rolls backward, giving you some time to escape. | |
| Kamek | × | × | × | × | × | × | × | × | Charges at you on a broom. It cannot be defeated, so you have no choice but to avoid it. | |
○: Can be defeated
△: Can be defeated under certain conditions (e.g., multiple attacks, attacking during a specific state, etc.)
×: Cannot be defeated
★: Transforms into a Star (only in the Green Watermelon column)
The "Transform" column indicates whether the enemy can be defeated by using the Special Item "Anywhere POW", "Winged Cloud Maker", or by passing through the Middle Ring.