5-8: Raphael The Raven's Castle
Map
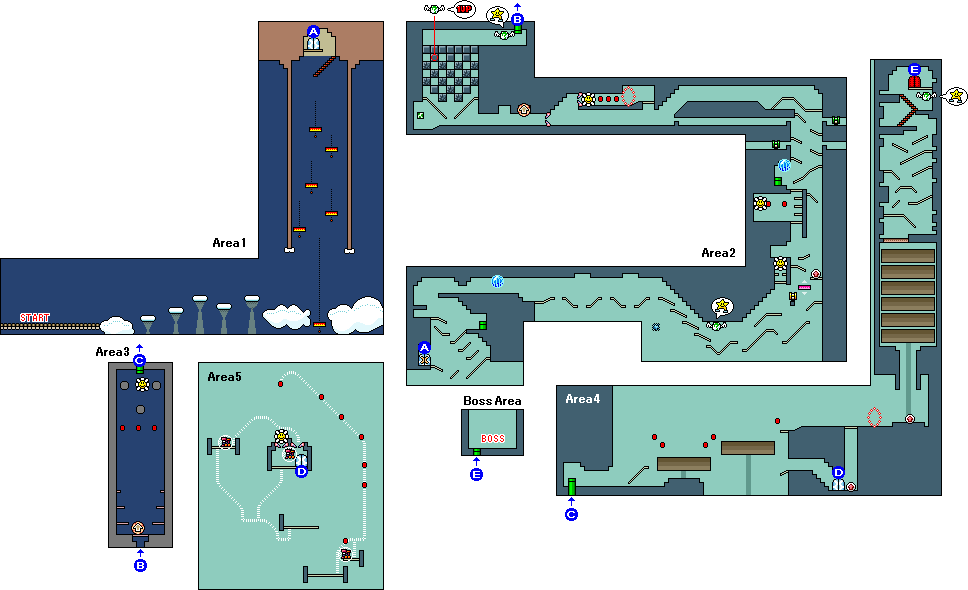
Stars
Area 2 ×20
- Inside the Winged Cloud in the bottom-right part ×5
- Pass through the Middle Ring above the topmost platform, reached by jumping off the Bullet Bill ×10
- Inside the Winged Cloud right before the final pipe ×5
Area 4 ×15
- Pass through the Middle Ring at the bottom-right ×10
- Inside the Winged Cloud below the Exit Door at the top-right ×5
Red Conis
Area 2 ×5
- Above the narrow platforms reached by jumping off the Bouncing Bullet Bill in the bottom-right part ×2
- Above the topmost platform reached by jumping off the Bullet Bill ×3
Area 3 ×3
- While ascending with the Spinning Wheel ×3
Area 4 ×5
- Above the first Twirling tier in the early part ×4
- At the top-right of the second Twirling tier in the early part ×1
Area 5 ×7
- After transforming into a Train, run from the bottom-right to the top ×7
Flowers
Area 2 ×3
- Above the narrow platform just above the cannon in the bottom-right part, reached by jumping off the Bouncing Bullet Bill
- Above the narrow platform to the top-left of the Spring Ball in the bottom-right part, reached by jumping off the Bouncing Bullet Bill
- Above the topmost platform reached by jumping off the Bullet Bill
Area 3 ×1
- While ascending with the Spinning Wheel
Area 5 ×1
- After transforming into a Train, run from the bottom-left to the top
Boss: Raphael the Raven
You will be launched to the star and will have to fight on top of it. There are two posts, they will protrude to the opposite side when you pound the ground to push them. At the moment the boss move to the opposite side, push the post to deal damage. The boss's movement will get faster each time you deal damage. After dealing damage three times you will defeat it.
By the way, occasionally the boss will attack with a wave, but you can avoid it if you stand on top of the post.
Enemies
| Name | Defeat | Description | ||||||||
|---|---|---|---|---|---|---|---|---|---|---|
| Eat | Stomp | Pound the Ground | Egg | Green Water -melon | Red Water -melon | Blue Water -melon | Trans -form | |||
| Shy Guy | ○ | ○ | ○ | ○ | ○ | ○ | ○ | ○ | A normal Shy Guy. It appears from the pipe until the eggs are full. | |
| Train Bandit | × | × | × | × | × | × | × | ○ | The graffiti on the wall comes to life and starts chasing you. | |
| Mace Guy | ○ | ○ | ○ | ○ | ○ | ○ | ○ | ○ | Swings a spiked ball. You can avoid it by crouching. | |
| Cloud Drop | ○ | ○ | ○ | ○ | ○ | ○ | ○ | ○ | Hovers in the air, moving vertically or horizontally. | |
| Bullet Bill | ○ | ○ | ○ | × | × | ○ | ○ | ○ | Spawns infinitely from the cannon. The cannon can only be destroyed with a Blue Watermelon. | |
| Bouncing Bullet Bill | ○ | ○ | ○ | × | × | ○ | ○ | ○ | Spawns infinitely from the cannon and bounces back when it hits a wall. The cannon can only be destroyed with a Blue Watermelon. | |
| Blow Hard | × | × | × | × | × | ○ | ○ | ○ | Shoots Needlenose towards you. It cannot be defeated by regular attacks, but you can stun it slightly by hitting it with an egg or by pounding the ground nearby. | |
| Needlenose | ○ | × | × | ○ | ○ | × | × | × | Appears as a weapon for enemy attacks, such as being spit out by a Wild Ptooie Piranha or dropped by a Grinder. | |
| Kaboomba | × | × | ○ | ○ | ○ | ○ | ○ | ○ | Fires cannonballs. It can be defeated by pounding the ground or hitting it with an egg. | |
| Flightless Goonie | ○ | ○ | ○ | ○ | ○ | ○ | ○ | ○ | Runs straight towards you. | |
| Bowling Goonie | × | × | ○ | × | × | ○ | ○ | ○ | Moves by rolling. You can't swallow it, and it can only be defeated by pounding the ground or with an item. | |
| Raven | × | ○ | ○ | ○ | ○ | ○ | ○ | ○ | Moves around the sphere. | |
○: Can be defeated
△: Can be defeated under certain conditions (e.g., multiple attacks, attacking during a specific state, etc.)
×: Cannot be defeated
★: Transforms into a Star (only in the Green Watermelon column)
The "Transform" column indicates whether the enemy can be defeated by using the Special Item "Anywhere POW", "Winged Cloud Maker", or by passing through the Middle Ring.