4-8: Hookbill The Koopa's Castle
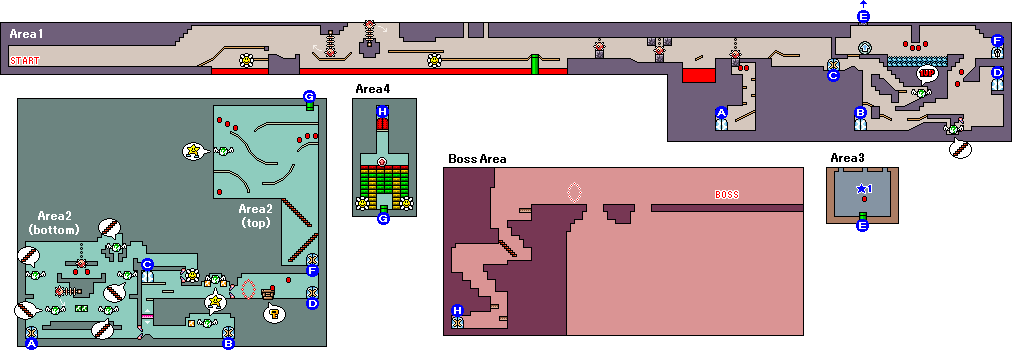
Map

- The Cracked Block on the ceiling above the Spinning Wheel in the later part of Area 1 can be broken by hitting it with an egg. Then you can enter Area 3 through E
- The Red Coin at ★1 (in Area 3) will appear after defeating the two Puchipuchi L in the room.
Stars
Area 2 (bottom) ×20
- Inside the Winged Cloud next to the yellow Egg Block in the bottom-right part ×5
- Inside the Winged Cloud between the two yellow Egg Blocks in the center part ×5
- Pass through the Middle Ring, found after entering from the door to the top of the stairs at the far right part of Area 1 ×10
Area 2 (top) ×5
- Inside the Winged Cloud at the top-left ×5
Boss Area ×10
- Pass through the Middle Ring at the highest point ×10
Red Conis
Area 1 ×8
- Below the Cracked block under the windup Ball 'N' Chain in the middle part ×2
- Above the thorns in the top-right part ×4
- At the bottom-left of the Locked Door in the top-right part ×2
Area 2 (bottom) ×4
- Below the windup Ball 'N' Chain in the top-left part ×2
- Located where you entered from the door to the top of the stairs at the far right part of Area 1 ×2
Area 3 ×1
- Appears after defeating the two Puchipuchi L in the room ×1
Area 2 (top) ×7
- At the far left, after going beyond the stairs ×1
- Below the pipe at the top-right ×3
- At the top-left ×3
Flowers
Area 1 ×2
- Above the lava in the early part (collect it by using the shell)
- Above the lava in the middle part (collect it by using the shell)
Area 2 (bottom) ×1
- Right before the central flipper
Area 4 ×2
- At the bottom-left
- At the bottom-right
Boss: Hookbill the Koopa
Each time you hit the egg on its head, its body will rise, and it will flip over after four hits. Then, pound the ground on its belly to attack before it gets up. When you deal damage, it will bounce off the ground and attack. To avoid this, try to stay as far away as possible or flutter jump high after the recoil from pounding the ground. You can defeat it after pounding the ground three times.
It will spit out an egg if you step on its head, so to replenish your eggs.
Enemies
| Name | Defeat | Description | ||||||||
|---|---|---|---|---|---|---|---|---|---|---|
| Eat | Stomp | Pound the Ground | Egg | Green Water -melon | Red Water -melon | Blue Water -melon | Trans -form | |||
| Boo Guy | ○ | ○ | ○ | ○ | ○ | ○ | ○ | ○ | Floats in the air and sways gently. | |
| Beach Koopa | ○ | ○ | ○ | ○ | ○ | ○ | ○ | ○ | A Koopa Troopa without its shell. It will attach to the shell lying on the ground. | |
| Koopa Troopa | △ | △ | ○ | △ | △ | ○ | ○ | ○ | After you stomp on it, it loses its shell and becomes a Beach Koopa. If you pound the ground, it can be defeated in one hit, even when it still has its shell. | |
| Fishing Lakitu | ○ | ○ | ○ | ○ | ○ | × | × | ○ | Tries to fish for the baby. After defeating it by stomping, you can ride on the cloud. | |
| Hot Lips | × | × | × | × | × | × | × | ○ | Emerges from the lava and spits fire. Touching it will make you mistake. Hitting it with an egg will stagger it slightly. | |
| Puchipuchi L | × | × | △ | × | × | ○ | ○ | ○ | If you crush it by pounding the ground, it splits into four normal Milde. | |
○: Can be defeated
△: Can be defeated under certain conditions (e.g., multiple attacks, attacking during a specific state, etc.)
×: Cannot be defeated
★: Transforms into a Star (only in the Green Watermelon column)
The "Transform" column indicates whether the enemy can be defeated by using the Special Item "Anywhere POW", "Winged Cloud Maker", or by passing through the Middle Ring.